Search This Blog

Showing posts with label Pastry. Show all posts

Tuesday 25 October 2016

Jozankei Nature Illumination.

Image borrowed from Jozankei.
Jozankei Nature Luminarie.
This probably is the latest news on my blog, I post this at 10/25/2016 if you read this post at this date, means you still have about 5 days chance to visit this wonderful Jozankei Nature Luminarie. The Jozankei Onsen is currently celebrating their 150th anniversary and they are lighting up the forest park, from the Futami Koen until the Futami bridge, Opening every evening on 6/1-10/31 this year.

Wednesday 5 October 2016

Strawberries and Kiwi Mascarpone cream (Tiramisu)

    I have tried a similar version of this in the cruise ship tour. They are using blueberry and dark chocolate, and they also provide the original Tiramisu in a cup which is similar to the recipe below. 

Sunday 2 October 2016

Trio vegetables Dorayaki

Dorayaki

    Who is the Doraemon fan? Well, Doraemon is my childhood memories and I remember it the most in my life. I love the Dorayaki in my previous workplace also my first time eating Dorayaki experience, it is so fluffy and flavorful, yet it is not so sweet to eat and the taste is balance, it seems like that I could eat no matter how much they serve me :).
Pancake in Japan Fukuoka, this is not dorayaki:).

Dorayaki in Japan

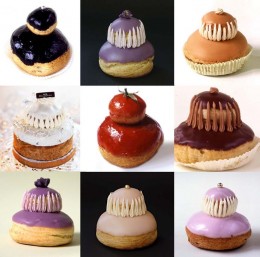
    Dorayaki is a common sweet in Japan which you can find easily in any convenient store, market, and specialty store, both in normal size and also mini size. It is also a famous sweet among the Wakashi (Japanese dessert) good to eat with green tea. The Dorayaki has improved since the day of its invention into the various flavor, appearance, and filling, you can find some sort of special Dorayaki if you find one Dorayaki lover.

The Trio vegetables Dorayaki

    The trio vegetables Dorayaki is a colorful Dorayaki recipe consist of green (spinach), orange (carrot), and purple ( Purple sweet potato), grill over low heat on a griddle to prevent brown but soft and fluffy. In addition, stuffed with not only Azuki (red bean) paste, but extra fruit and cream, boost your diet while eating a dessert.

Ingredients for 6 Dorayaki (30 ml for each pancake)

Prepare Time : 20 minutes
Cook Time :20 minutes
Ready In : 50 minutes

Dorayaki Batter
200 gm Pancake Mix
2 nos Whole eggs
1 tablespoon Water
5 tablespoons Granulated sugar
2 tablespoons Honey
1 tablespoon Mirin
Batter coloring
80 gm purple sweet potato
1 teaspoon lemon juice
30 gm Bok choy/ spinach
60 gm Carrot
Pancake filling
200 gm Mashed sweet potato
3 tablespoons Milk
2 tablespoons Granulated sugar
1 pinch Salt
100 ml Cream
1/2 tablespoon Granulated sugar
2 nos  Cherry tomato
2 tablespoons Sweet soy bean paste
1/3 nos (2 slices) persimmon
2 tablespoons sweet red bean paste

Mise en place:

1) Cooked and finely mash the purple sweet potato, then press it through a strainer.
2) Cooked and finely mash the carrot, then press it through a strainer.
3) blend the Bok choi/ Spinach with a little bit of water in a blender, then press it through a strainer.
4) Cube the sweet potato, cooked, and finely mashed, then press it through a strainer.
5) Thinly slice the persimmon into a ring shape.
6) Slice the each cherry tomatoes into three.
7) Whip the cream and sugar into a soft peak.
8) Cook the sweet potato in number(4) with milk, sugar, and salt, cook until it like a paste.

Method:

1) Whip the whole eggs, mirin, and granulated sugar in a bowl, until the mixture becomes light yellow.
2) Then whisk in the honey and mix them well.
3) Mix in the pancake mix batch by batch about three times, then water.
4) divide the pancake batter into 3 small bowls.
5) dye the small bowls of batter with carrot paste, spinach paste, and sweet potato paste, add a teaspoon of the lemon juice into the sweet potato batter bowl to prevent color change.


6) rub some oil in the pan and heat it up, make sure the griddle is free from oil streak.
7) pan fry the pancake over low heat to prevent burn mark, make sure the pancake is cooked.
8) Sandwich the red bean paste and sliced persimmon with the carrot pancake.
9) Sandwich the soybean paste and sliced tomatoes with the spinach pancake.
10) Sandwich the sweet potato paste and cream with the purple sweet potato pancake.


Thursday 29 September 2016

Halloween Pumpkin Pie with puff pastry

Pumpkin pie


Pumpkin pie is a sweet treat pie with spiced, pumpkin-based custard filling. The pumpkin is an image of harvest time, and pumpkin pie is frequently eaten amid the fall and early winter. In the United States and Canada, it is typically arranged for Thanksgiving and Christmas, and is additionally included at Halloween. 

Sunday 25 September 2016

Thursday 22 September 2016

Banana Choco Pizza

   Banana Choco Pizza

  I feel like I want to eat something chewy, crispy, and sweet, it is hot around my place so I prefer something cold, but not too cold, just enough to release heat. Hence I got this recipe, Banana Choco!

Monday 19 September 2016

Chocolate Basket

    Today I am going to show you that a recipe has no recipe:) only dark chocolate and cocoa powder, all you need is your decoration skill, as simple as everyone can do. The product is mainly used for decoration, but you can stuff candies or sweets inside for party or else.

Thursday 15 September 2016

Baked Alaska

http://wattsupwiththat.com

About Baked Alaska

Baked Alaska is a common dessert in the Western country while it is something still remain mysterious for most of the Asian, unlike the pudding of Black forest cake is well known in Asia.

Wednesday 14 September 2016

Religieus

Religieus variety
 
http://www.pinterest.com

About Religieus

Religieuse ルリジューズ is the common pastry that you can find easily in every cake shop in every Paris street corner.

Tuesday 13 September 2016

Muscovado Creme Brulee

Muscovado Cream Brulee
http://cookpad.com/

About Cream Brulee

Once again, I know you all have tried these famous and delicious dessert, but I still want to talk about it, consider to help to improve my writing skill. Creme Brulee was known as burnt cream as the "Brulee" means burnt in French, or trinity cream, is a dessert consisting of a rich custard base topped with a contrasting layer of hard caramel and it is normally served at room temperature. The custard base is traditionally flavored with vanilla but can have a variety of other flavorings such as green tea flavor.

Pudding

Source

Panna Cotta

Source

What is the different between the three brothers?

Do you know what is different between the Cream Brulee, the Pudding, and the Panna Cotta? They all look a likes to me, soft and sweet, shaking while you vibrate them. However, the ingredients are the main key which makes them different.
The Pudding is consist of Milk base+eggs+sugar, so the milk is the main liquid in the recipe.
The Creme Brulee consists ofCream base + eggs + sugar, so the cream will always use more cream in the recipe.
The Panna Cotta consists of Cream + Milk + sugar + Gelatin, the Panna Cotta doesn't have the egg so the Gelatin is used for its hardening.
I hope this will help :)

Muscovado Cream Brulee

Have you tried any cream Brulee before? Do you like it? Well, I can tell you very very sure that I love it so much. Even though I have worked in kitchen for so many years and yet I don't have any experience in pastry or dessert, but this cream Brulee is simple and easy to make at home, with its simple cooking method and easy ingredient, however, the ingredient at here is a bit hard to find, so maybe you could use something else to substitute like gula Melaka if you are from Malaysia, brown sugar and coffee if you are from another country, these are the best I could think off. As Muscovado sugar is the very pure sugar derived from sugar cane, without any refinement, it is dark and brown with its appearance, and of course, the sweetness is less sweet than the refine sugar, but the flavor of the Muscovado sugar is awesome.

Cook Time

Prep time: 20 min
Cook time: 30 min
Ready in: 50 min
Yields: 6 bowl

Ingredients

  • 5 nos           Large egg yolk
  • 60 grams     Muscovado Sugar, For the Brulee
  • 160 ml         Milk, for the Brulee
  • 280 ml         Cream, for the Brulee
  • 2 teaspoons     Brandy, For the Brulee
  • 100 grams        Muscovado sugar, For the jelly
  • 8 grams            Agar Agar Powder, For the jelly
  • 330 ml              Water, For the jelly
  • as need           Sweetened Red Beans, For garnish
  • as need           Chervil, For garnish
  • as need           Ice, For ice bath the boiled jelly mixture

Let's cook!

  1. Mix the milk, cream, and Muscovado sugar in a deep saucepan, then warm it over low heat while stirring it gently, reaching the temperature of 60~70°C or a tiny wisp of steam begin to escape, then remove the pan from the heat.
  2. Place the egg yolk in the bowl which could fit the Brulee mixture, stir the Brulee mixture into the egg yolks in a stream.
  3. Bring the mixture through a Strainer to remove any unseen impurities or the sugar particle, then add in the Brandy and mix them well.
  4. Transfer the mixture into a jar then begin to flow the Brulee mixture into the bowl, or any pastry mold you have.
  5. Flow the hot water into the baking tray until the center level of the bowl, then cover with a layer aluminum foil. Set the Brulee mixture to steam bake in the oven for 30 minutes with 180°C.
  6. Meanwhile, make the Jelly by mixing well the Muscovado sugar and Agar powder, then add in the water continue stirring and mix them well.
  7. Transfer the Jelly mixture into a deep saucepan, and apply heat to the mixture while stirring it gently.
  8. Bring the mixture to a boil then remove from the heat, again sieve the mixture and to remove any stubborn jelly and sugar particles.
  9. Ice bath the Jelly mixture to let it hardened quickly.
  10. Scoop the Jelly with a tablespoon and arrange it on every steam baked cream Brulee.
  11. Reheat the remaining of Muscovado jelly into liquid, warm it gently to about 60°C, or just melted.
  12. Pour the Jelly liquid on the cream Brulee.
  13. Arrange some sweet red bean on top and garnish with a sprig of chervil.

Cooking with picture

Making the Cream brulee mixture
Making the Cream Brulee mixture | Source
Stir the mixture into the egg yolk
Sieve the content
Sieve the content
Distribute the liquid.
Preparation for the steam bake.
Making the Jelly
Making the Jelly
Sieve and ice bath the jelly liquid.
Scoop the jelly.
Scoop the jelly.
Melt the remaining jelly back into liquid again.
Melt the remaining jelly back into a liquid again.
Garnish with sweet red bean and the chervil


Monday 12 September 2016

Message Swiss Roll

nice Swiss roll

The worst and the best roll cake.

Looking at the log of Swiss roll which looks so delicious and inviting, my hand reach to a fork, plate, and a knife, begin to slice from its side, squeezing out the cream from its inner part, wow! A moment later, a slice of roll with the mushy spiral pattern has been placed on the plate. Raising a fork over it and tear away a tiny piece, fetch it into my mouth then begin to chew. The sponge is so dry until it absorbs away all my saliva, while the cream is rough with sugar particle...... . Wait!!!!! This is not supposing the Swiss roll that I always dream of. It supposes to be a soft sponge and smooth cream as well as filled with various fresh fruits and Icing, sweet and savory, which will squint your eyes and make you lost in the maze of silky smooth taste.
Source

The Swiss roll.

Swiss roll is a flat baked sponge cake which rolls with the jam, jelly, or cream, slice from the side with a result of spiral shape slices. It is a very simple confectionary yet famous dessert worldwide with its various decoration and arrangement. A long time ago and now, the roll cake had changed a lot but it should be the same thing. The roll cake at the old day is less cream or jam as they were used to bind the sponge so the roll cake doesn't collapse, and also, you will get a spiral look if slice from the side. For modern day, the amount of cream or jam has become large until you could never find a spiral shape anymore, instead of an "O" look in the recent year. Furthermore, a pure whipped cream and nice fresh fruits are used for making the modern roll cake, some more the sweetness is being suppressed in the recipes, producing a nice and cool taste.
Jam roll
Jam roll | Source

The mystery Swiss roll origin.

The origin of Roll cake could be discovered since the 15th century at the Age of Discovery in Europe. Spain is able to obtain a cheap sugar from the conquered land --South America. The local tried to mix the egg and sugar, then cook it over a fire to make a sponge cake thingy. However, this sponge cake is very fragile and it just collapses easily, so in other to eat the cake easily, the folks apply a layer of jam on it then roll it up, hence this is the earliest version of the roll cake. On the other hand, there is the various way of theory talk about the origin of the Swiss Roll since its origin is unclear. It is said that the roll cake was born in United kingdom, but it has been called as a Swiss Roll in the United Kingdom just because Queen Victoria brought the Roll cake from Switzerland.

Message Swiss Roll

Source

The Swiss roll recipe

Swiss Roll is an easy sweet recipe which consists a lot of basic pastry knowledge, you make a nice sponge, you make a nice dessert, are we agree. Imagine the first day in your pastry cooking class, the lesson will always be cookies or sponge, because it is the base of all pastry product and also the main suppression to the greasy sweet. Finally, making a sponge and apply a layer of cream is really boring, so, this recipe will introduce you how to make a picture on your roll cake, then you can throw away all your Icing and glaze which could only perfectly done by the pro. The message roll cake.

Cook Time

Prep time: 40 min
Cook time: 40 min
Ready in: 1 hour 20 min
Yields: 6 people

Ingredients

  • 8 nos                   Strawberries, small diced
  • 150ml                  Whipping cream, Whipped with sugar
  • 1 tablespoon       Sugar, for the whipping cream
  • 25grams             (A) Egg white, for meringue
  • 25grams             (A) Granulated sugar, for meringue
  • 25grams             (A) Soft flour/ cake flour, sieved, for meringue
  • 25grams             (A) Butter, melted, for meringue
  • as need              (A) Edible coloring: Red, to dye the meringue
  • as need (about 2 teaspoons)        (A) Cocoa powder, to dye the meringue
  • 3 nos                  (B) Whole eggs
  • 90grams             (B) Soft flour/ Cake flour
  • 30grams             (B) Butter, melted
  • 90grams             (B) Granulated sugar
  • 100 ml                (C) Water, for the sugar syrup
  • 2 tablespoon      (C) Sugar, for the sugar syrup

Let's Roll!!

  1. Mise en place, Melt the butter in both group (A) and (B) ingredients, and set aside.
  2. Mise en place, Leave the eggs in the group (B) at room temperature. Sieve all the soft flour.
  3. Mise en place, bring the group (C) ingredients to a pot to make a sugar syrup, simply boil the water and dilute the sugar, remove from heat and set aside.
  4. Group (A) ingredient is the batter for the pattern. Whip the egg with the sugar until soft peak, Fold in the sieved soft flour then fold in the melted butter.
  5. Separated the meringue batter equally to two, then dye them with red edible coloring and cocoa powder. Do not over color the batter, add the coloring into the batter as little as possible, until the desired color.
  6. Cut a piece of triangle baking paper, fold it into a cone shape then form a mini piping bag. After that fill it with the single color meringue and seal it, repeat the same procedure to make another mini piping bag.
  7. Arrange a layer of baking paper on the baking tray and stable it with butter at the bottom. Draw a pattern on a piece of baking paper with pencil, then arrange the depicted paper on the baking tray with the ink face-down, we don't want to eat the ink right. :)
  8. Begin to pipe the meringue according to the pattern. Then bake it in the oven for 2 minutes with the rough heat of 180°C. Pull it out from the oven and set aside.
  9. Make the sponge with group (B) ingredients, have the mixer and ingredients ready.
  10. Add the sugar into a bowl of cracked eggs, then begin to whip until the batter is formed, evidently, the mixture is turning pale, thick and sticky.
  11. Check constantly when the batter formed, whip until there is a streak could remain on the surface, which hardly could sink back into the batter after one or two seconds, then we are good.
  12. Fold in the sieved soft flour gently as we don't want to collapse the batter by squeezing out its every air. folding until the flour is completely blended into the batter, and a silky puffy batter is formed.
  13. Mix the tiny bowl of butter with a small amount of batter, then pour the butter all over the big bowl of batter, gently fold the butter in and blend them well.
  14. Pour the batter all over the dried meringue pattern, then spread the batter all over the baking tray with the scrapper.
  15. Lift the baking tray and knock it on the table gently to pull out every big bubble which will make big holes in the sponge. Set to bake in the oven for 10~12 minutes with 180°C.
  16. Remove the baked sponge from the oven with a satisfied browness, pull it out from the baking tray immediately to avoid rough heat, set aside to let it cool completely.
  17. Pull the baked sponge back to the baking tray, cover with a layer of baking paper, then a light chopping board, this will help you turn the sponge over without breaking it as the sponge is so fragile that it will tear apart when you lifted one side.
  18. Peel out the baking paper from the baked sponge, and check the satisfied result. Cover with a baking paper again, then the light chopping board again, turn it over.
  19. Brush the baked flat sponge with sugar syrup entirely, spreading the sweet whipped cream on the flat sponge with more amount at the front, where is nearer to you, so the center part will be thick with cream.
  20. Arrange the diced strawberries on the cream, leaving about 1/4 space empty at the back.
  21. Lift the baking paper and gently roll the sponge and wrap the cream and strawberry.
  22. Gently press and shape it once it rolls to the end, chill the roll with the paper together in the fridge for 30 minutes.
  23. Slice off the both end, you should get a nice spiral shape Roll Cake.

Cooking with the picture!

fold the sieved flour into the meringue.
fold in the butter.
fold in the butter.
dying the meringue with cocoa powder.
Dye the meringue with edible coloring
fold the cone shape and make a mini piping bag.
fill the mini piping bag with the dyed meringue.
arrange the baking paper, and the pattern at the center.
arrange the baking paper and the pattern at the center.
face the ink at the bottom.
begin to pipe the dyed meringue at the depicted paper.
bake with the 180°C rough heat in the oven for 2 minutes.
Making the sponge batter.
Whip it until pale, and a streak could remain on the surface for one or two seconds.
Fold in the sieved soft flour.
Fold in the melted butter.
Pour the batter on the dried meringue pattern, then spread to every side with a scrapper.
Remove the baked flat sponge from the baking tray immediately after baked, and set aside to let it cool completely.
Turn over the fragile flat sponge.
Peel off the baking paper, then turn it over again.
Peel off the baking paper, then turns it over again.
Brush the flat sponge with the sugar syrup, then apply the whipped cream.
Arrange the dice strawberries.
Roll it and chill it like that in the fridge for 30 minutes.

Finish!

Slice off the both end to form a nice spiral looking roll cake.